Week 9: Defining your MVP and prototyping#
Studio Abstract#
In this studio, you will sketch out the features of your MVP, put together a paper prototype for it, and test it on others in your studio.
We will do the following exercises:
Brief self assessment
Sketch out the main functionality of your MVP
Define a paper prototype from your sketch
Get feedback on your paper prototype
Allocate which team members will implement which features of your MVP
Work on your project
Exercise 1: Self assessment for iteration 2#
⏱️ 10 minutes - Individual
Remember that self assessment you did for iteration 1?
Take the spreadsheet that you filled out, look at the feedback your legend provided for iteration 1, and do a short self assessment for iteration 2.
Exercise 2: Sketching out your MVP#
⏱️ 45 minutes - Group
Devices closed for this exercise
Using the paper provided by your legends, sketch out the features of your MVP.
A sketch is just a rough representation of the idea of your product. Putting it down on paper before building wireframes or full applications helps:
Surface new ideas and edge cases
Force early design decisions
Avoid rework during development when you realise there are things missing.
Think of the following:
What are the features that will implement our value proposition?
How do they fit together in an application?
What is the flow between different features?
Are these really the minimum set of features required for an MVP?
Note
It is a minimal viable product – you do NOT need to define every idea that you have nor sketch out functionality that you plan to add in the future.
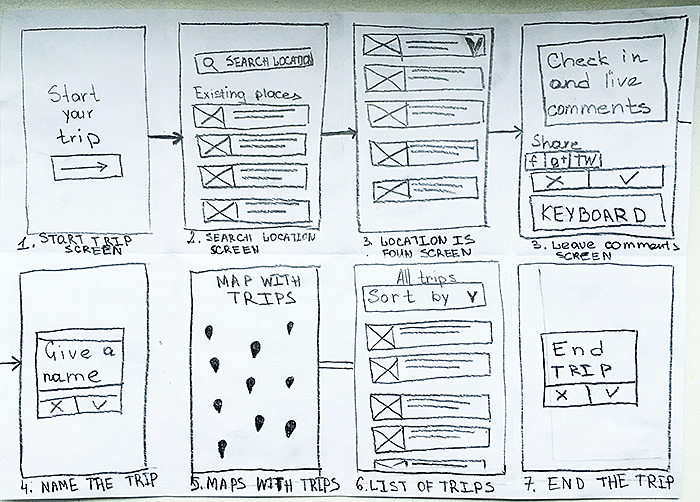
Fig. 5 A sketch of an MVP for Trip Tracker. An MVP sketch should be rough and easy to change – it is there to make your product idea more concrete to you and others – it is not a design for a user interface. Image source: Anna Delendik#
Plan#
⏱️ 15 minutes - Group
Devices can be used for this exercise
As a team, allocate who will implement which MVP features and by when.
Write this down as a plan to show your legend, and add it to your Github project task tracker.
Remember to define: who does what by when?
Take a break#
⏱️ 10 minutes
Exercise 3: Paper prototyping#
⏱️ 30 minutes - Team
Devices closed for this exercise
Next, take your sketch and put together a paper prototype of your MVP features.
As a team, write down three specific tasks a user should be able to complete using your MVP (e.g., ‘Log in and find their last trip’). These tasks will guide your prototype testing.
Exercise 4: Work on your project#
⏱️ Remainder - Team
In the rest of the studio, take this time to work on your project, even if you are ready to submit iteration 2.
One important part to not forget is the competitor analysis.
If you have no idea what a competitor analysis is, read the section on competitor analyses in the chapter on value propositions.
Note
Teams in COMP7110: Recall from the assessment description that as well as doing a competitor analysis, each team member needs to research the business model of a competitor, and specify this as a business model canvas.
Exit ticket#
You exit ticket is:
Show your legend your sketch (before the break).
Show your legend your team plan in Github projects for who will implement which features.
Demonstrate your paper prototype to your legend and get feedback.
Show your legend your competitor analysis so far.